Related Info
STAR Cutting Tip Sharpening Instructions
for Canister Style Forage, Uni-Forage and Universal Samplers
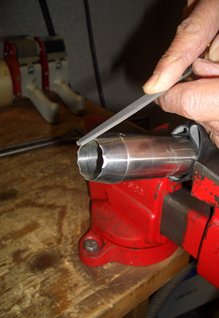
- Place probe in a “vise” using rubber or cloth to protect the stainless steel probe from scratching or damage caused by the vise.
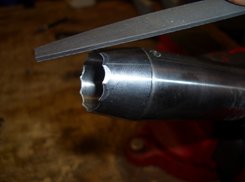
- Select a “smooth” or “Fine” FLAT file. Do not use a round, crescent, chainsaw, or any type of coarse file. (I know you will think you should use a round file, but don’t. Each of the 12 flutes is on a flat plain. Using a flat file will maintain the original shape. Using a round file will deepen the serration and change the angle of the cutting edge. This will reduce the effectiveness and shorten the life of the cutting tip.)
- Secure the probe in the vise at about a 30° angle (< 30°) and begin sharpening by carefully filing away from the probe tip.
- There are 12 serrated flutes on each cutting tip; it is important to retain both the number of flutes on the cutting tip as well as the configuration of the flutes. File slowly, watching for the new-filed surface to coincide with the original serrated surfaces.
- Only a few file strokes per contour (flute) are necessary to sharpen the cutting tip. Under normal use sharpening will be required after coring 750-1000 samples. If you are sampling wet hay or silage, sharpening will be required more frequently. Do not allow the flute edge to become “dull” or “rounded” because it requires a lot more effort to take a sample and it is more difficult to re-sharpen the tip. It is much better to keep the cutting tip sharp with regular sharpening.
- Always use the protective end-cap to preserve the cutting edge and to prevent injury.
Note: If the cutting edge is filed smooth and round or into deep groves like a saw, the cutting efficiency will be destroyed.


Sub-Sampling
When the samples from the 15-20 cores is too large to submit for analyses, it is important that the sub-sample you take properly represents the entire sample.
- Start by mixing the entire sample in your container.
- Turn the container upside down and empty everything on to a piece of plastic about 1m square. Plastic is recommended because it does not absorb moisture from the forage. It is a good idea to do this sub-sampling in the shade and out of the wind to reduce the chance of drying the sample out.
- Take one corner and fold it over to the opposite corner. You will notice that about half of your sample is folded over on top of the other half.
- Take the next corner to the left and fold it over to the opposite corner.
- Continue to fold each corner over until you have gone around the plastic 3 times. The sample has now been mixed enough.
- Using your hand, “cut” the sample in half from top to bottom and then again from side to side. Carefully separate the 4 quarters. Remove 2 of the quarters entirely. Be sure to wipe off all the fines that were in each quarter that you are removing.
- Push the remaining 2 quarters into one pile.
- Repeat steps 3,4 and 5.
- Using your hand, “cut” the sample in half from top to bottom and from side to side. Take all of one quarter and put it into the bag to be sent away for analyses. Be sure to put all of the fine material (small particles) from the quarter into the bag because they contain a lot of nutrients.
- It is a good idea to take another quarter and put that into a bag you keep. If you are selling hay, this can be matched to the lab results to show to a buyer.
This process will generally give you a sample between 100 – 200 grams (for hay under 14% moisture), which is usually adequate for analyses. Depending on the size of the sample you start with, you may have to adjust this process slightly to achieve the desired size of sample you want to send to the lab. For example, if a larger sample is required, you could send ½ the sample in Step 9.
Always check with your lab to see what size of sample is required for the specific tests you want done. The sample weight will vary a great deal depending on the moisture content, so you need to tell the lab whether you are sending a dry or moist sample. Once they receive your sample, the lab will usually grind it into a very fine powder and thoroughly mix it. They will then take a scoop of this powder to run through the testing procedure. If you send in a large sample, the lab may charge you an extra fee for the extra time it takes to grind it all up. If you do the sub-sampling, it saves the lab from having to take extra time to handle your sample.
It is a good idea to keep a sample for yourself. If you are selling hay, you can match the test results with the sample you kept to show potential customers.
Instructions For Replacing the Cutting Tip on SLIM, ABS and Aluminum Canister Forage Samplers
You can easily replace the entire probe by unscrewing the brass fitting with a wrench and then screwing the new probe in place. The new probe comes with the cutting tip already installed and a new brass nut ready to attach to the canister. For the Slim PVC canister model order part number 130. For the ABS models order part 140. For the Aluminum canister model order part number 170.
If you wish to save some money, you can replace only the Star cutting tip. The instructions for doing this are as follows:
- Heat the cutting tip to about 250 degrees C. in order to loosen the Loctite 680 permanent retaining compound used to hold the tip in place. You will be able to pull the tip off with pliers when the glue becomes soft.
- You must clean all residue from the outside end of the probe to expose clean metal where the 2 surfaces will join. This can be done with a file or with emery cloth. When this is done, the new tip should slide onto the probe freely. It is best if there are some scratches in the metal as this will help the retaining compound adhere to the metal.
- Coat both joining surfaces (outside the probe and inside on the tip) with permanent retaining compound (ie. Loctite). This is available at most hardware stores and automotive stores. It is easy to apply with an artist’s paintbrush. Insert the tip with a slight twist. Wipe away excess retaining compound on the outside of the probe using tissue. Clean any excess retaining compound from inside the tube by inserting a wad of tissue into the canister end of the tube. Remove the padded cap and using the push-out rod, push the tissue out the cutting tip end. HOLD THE TIP SECURELY IN PLACE WHILE DOING THIS BECAUSE THE GLUE WILL NOT BE SET YET.
- Allow the retaining compound to cure (according to the label instructions) before use. (Usually 12 – 24 hours)
If you wish to replace the tip only, for the Slim and ABS canister models order part number 141. For the Aluminum canister model order part number 171.
General Information about cordless drills
All Star Quality Samplers Inc. forage sampling tools that are drill driven require a ½” (13mm) drill chuck. All drills of 18 volts or greater have models with this size of drill chuck.
There are many brand names to choose from. The manufacturers are continually making new models so it is not possible to recommend any one brand or any one model.
Most 18V drills or greater will work with our samplers (Uni, Clear-PVC, Multi Aluminum) except for the Universal forage sampler. Please see the recommendations below including the section for the Universal in particular.
General Guidelines for ALL Star Quality Samplers Inc. Drill Driven Forage Sampling Tools
- Brushless motors usually produce more torque and use less power so batteries last longer. Also, you do not have to replace brushes because there are none to wear out. This feature is worth the extra cost.
- Torque and kickback from the drill are a concern with higher density, higher moisture materials and when taking deeper samples. If you are taking samples under any of these conditions we recommend using a drill that has a side handle grip which allows you to use 2 hands to manage any kick back from the drill. Some drills have a “slow start” feature where it takes 2-3 seconds to reach full speed. This greatly reduces the stress on your hands.
- Although not a requirement, a combination drill/hammer drill is often built more robust which is a good feature. If you use one, never use the hammer drill setting with Star Quality Sampler Inc. tools.
- High speeds should not be used because it heats up the cutting tip making it dangerous to handle. It can result in a fire hazard. If the drill has a “throttle lock” to set the maximum speed, that can be helpful.
- Larger batteries last longer but they cost more and are heavier. In general, we recommend a 3Ah or larger battery for taking samples in dry hay. A charger that can be plugged into a vehicle is beneficial because you can charge batteries while driving. A rapid charger means that you don’t need as many batteries as long as you can run the charger while you are using the sampler.
- Impact drills or Impact Wrenches should not be used on Star Quality Samplers Inc. They dull the cutting tip faster and our tools are not built to handle the extra stress the “impact” action creates. Some of these tools may have enough torque to force the sampler into the forage, even with a dull tip, but you will not get a truly representative sample. A sharp cutting tip is needed to cut cleanly through the forage so you get a representative sample.
Considerations for use of the UNIVERSAL forage sampler (in addition to those listed above)
- The side grip and slow start are both highly recommended with use of the UNIVERSAL forage sampler to manage the torque produced when sampling silage.
- We recommend you use 4Ah or larger batteries for the Universal forage sampler. Smaller batteries will discharge quickly due to the strong forces required to drill into silage. If you can afford 5Ah or larger, they will last longer so fewer batteries will be required. However, you may find it advantageous to have 2 or 3 smaller batteries rather than 1 large battery. This allows you to have one battery charging while you use the other one so you can take samples continuously.
If drilling into silage deeper than 2 metres, you may want to consider:
- There are now models rated at 36/40 volts (use 2 x 20 volt batteries) and 56/60volts. Generally, these produce more torque so they should give you the ability to drill deeper into the silage. They are heavier, so you have to be sure the drill never jerks out of your hands or you will probably break the drill connect. (If that happens, you will have to weld it back together or order a new one.)
- Some manufacturers now offer drills where the drill chuck is angled 90degrees to the drill body which is ideal for the Universal forage sampler when drilling vertically into deep silage. Some of these drills are designed as earth augers or as stud and joist drills and generally have the advantage of higher torque, a slower speed option and a second handle grip positioned for better stability. Note that when drilling horizontally into bales, some people find the 90degree angle of this drill less manageable than standard type drills. If you use the same drill for taking both vertical and horizontal samples, keep this in mind.
- Generally speaking gas powered drills have slower speeds and more torque than battery powered drills. This can be advantageous if you are drilling very deep into silage or you are taking many samples (for a research project or a very large dairy) at one time. For most people, the battery powered drills will work very well and are more convenient to operate.
